I'm not sure how many people look at my blog but for the moment, I have to stop posting.
I am still very tired from the events of my MIL's death and funeral, and my step-mom is fighting her own battle with cancer at the moment.
I will try to return after the holidays.
Thanks for understanding,
Chrissie
Tuesday, November 27, 2012
Wednesday, November 21, 2012
Lots More Christmas!

This is a one of a kind card! Placing all the pearls to fill a 1 3/4" circle punched piece cardstock, takes a long time! (I used all 3 sizes in the package...same as Monday.)
I have had the picture of this card from last year and I just had to make one of them. (There is some dried glue on the left side of the pearl ball ornament that doesn't show up in real life!)
I used Whisper White for the card base and Cherry Cobbler for the layer. I used the "Merry Christmas" from 'More Merry Messages' with Versamark ink and then heat embossed it with white embossing powder. It stands out really well on the Cherry Cobbler card stock. I used our 5/8" Organza Ribbon for the hanger and bow on the ornament.
Simple but very pretty, and quite stunning in person! Too bad the photos don't always show the shine or dimension to a card.
Enjoy, be back Friday!
Chrissie
Monday, November 19, 2012
Look at these Too Cute Snowmen!!

This idea came from Becky Roberts, a very talented US Demonstrator, from whom I have gotten some awesome ideas over the years!
These is so easy to decorate. First I punched the center out of Whisper White cardstock with the circle punch from the Itty Bitty Shapes Punch pack (3/8" diameter), then around it I punched the circle for the whole face with my 1 3/8" circle punch. Add some adhesive to the back and slide the piece over the "flame" of the tealight and adhere to the top.
The eyes and mouth are made from the medium and large pearls (119247 - $6.50/package) that I coloured with a black Sharpie marker. The hat is made from the Extra Large Oval punch (Gumball Green), the brim from the Large Oval punch (Cherry Cobbler), and the puff on the hat top with the 1/2" punch (Cherry Cobbler). Glue them all together and then run the whole hat through the Big Shot in the Square Lattice embossing folder to give it a knitted texture.
Underneath the tealight, put a piece using the 1 3/4" Scalloped Circle punch which is punched from Gumball Green, to be a coat collar! Remember to punch out a small circle (I used the same punch as for the flame) and place over the On/Off switch. I then adhered the Sweater Trim from the Holiday catalogue around the sides of the tealight and tied it in a bow.
I can see myself making a bunch more of these before Christmas for stocking stuffers. If you want to make some, you can use other reds or greens (or any colour that you like) that you have in your stash!
Have fun,
Chrissie
Friday, November 16, 2012
Fun Card for Either Guy or Gal

I followed some of the instructions from a US demo, Frances Martin. She always has great ideas.
To start I used a Crumb Cake card and, using an inkpad straight to the card, I made the background for the card. I used Soft Suede, Crumb Cake, and River Rock inks.
For the boots, I used the cowboy/girl style boots from "Bootiful Occasions". Then I scrunched up a brown lunch bag and glued it to a piece of thin cardboard using my glue stick. I used Early Espresso ink to stamp the boots once the glue was dry. I cut them out by hand and added gold brads. The little sign was made like the background and I just randomly cut the ends to look like a rustic sign.
I think it turned out to be a different look and so cute. What do you think?
See you soon,
Chrissie
Wednesday, November 14, 2012
Simple Thank You

It is a Whisper White card with a Whisper White front layer. I made a template using the Labels Collection Framelits. I then sponged Primrose Petals and Summer Starfruit inside the template. Then I stamped the tall grasses from "Serene Silhouettes" with Black Stazon ink, as well as the Thank You from "Curly Cute".
Adding a 3" piece of Summer Starfruit ribbon and a Ribbon Slide (from the Holiday catalogue), completes the front of this card.
Be back Friday,
Chrissie
Monday, November 12, 2012
Back with More Merry Monday!

Hope you enjoy this cute display item.
Be back on Wednesday,
Chrissie
Saturday, November 3, 2012
Be back November 12th
I will be away this week as my mother-in-law has passed away. She had a very good life and was 85. Unfortunately she had Alzheimers so has been gone for a long time.
I have some great cards and 3D projects to share with you next week. Hope you will come back next Monday!
Thanks for understanding,
Chrissie
I have some great cards and 3D projects to share with you next week. Hope you will come back next Monday!
Thanks for understanding,
Chrissie
Friday, November 2, 2012
Different Colour Combo!

I embossed the Raspberry Ripple layer with the Chevron Folder and the Crumb Cake flagged piece in the middle with the Square Lattice Folder. I also used the second largest design in the Apothecary Art stamp set and the coordinating Framelit. I stamped the design with Soft Suede ink and then I coloured the flowers with the Raspberry Ripple and Daffodil Delight markers. I added 3 of the Raspberry Ripple Dahlias (which I love!) and made a bow of the Raspberry Ripple ribbon.
Hope you like this colour combo and will try it yourself!
Be back on Monday,
Chrissie
Wednesday, October 31, 2012
Happy Halloween!!

Of course, no one uses these trays and metal letters to do any printing anymore but that is what my paternal grandfather did for his whole life for a career. When I was a young girl, my Grandpa took me to his work to show me what he did. It was amazing how they printed newspapers, flyers, and corporate advertising almost 50 years ago...one letter placed at a time to make the words! Now we just hit "Print"!!
I will have to think up my own design for a Christmas tray so you won't see that for a few weeks! (Maybe one of my friends will do a Christmas one that I can just copy, with their permission obviously!)
I hope that the weather where you are is good for the kids and for those answering their door!
Have a fun evening, and I will be back on Friday,
Chrissie
Monday, October 29, 2012
Stamp Sale ONLY TODAY!!
Just a quick reminder of the 15% off all stamp sets...just for one day. Send me an email if you want to order your favourites.
I am in London and will be back with a card on Wednesday!
Chrissie
I am in London and will be back with a card on Wednesday!
Chrissie
Wednesday, October 24, 2012
Be back Next Week
Just a quick FYI...
My 85 yr old MIL is critically ill and we are going to see her for what is likely the last time. I will try to be back for Monday.
Thanks for understanding,
Chrissie
My 85 yr old MIL is critically ill and we are going to see her for what is likely the last time. I will try to be back for Monday.
Thanks for understanding,
Chrissie
Friday, October 19, 2012
It's Friday of Our Big Stamping Event...Yeah!!

The card is on Calypso Coral (one of the In Colours that we will lose next May 31st...if you love this colour, get your paper, ribbon, and ink pad re-inker soon so you don't miss out!). I layered it with Wild Wasabi and the Daffodil Delight from the Polka Dot Parade DSP. There is another layer of Wild Wasabi about 1/3 the way from the bottom which I ran through the Big Shot with the Stripes Folder. Then I added a layer of Calypso Coral Ribbon and tied a bow. Next is another set of papers with the flowers on. The flowers are cut using the 2 biggest shapes on the Floral Fusion Sizzlet and the smallest is using the similar shape from the Itty Bitty Shapes Punch Pack (pg 183). The top layer is Whisper White and so is the greeting, which is stamped with Calypso Coral with the stamp from Itty Bitty Banners and cut using the Bitty Banners Framelits (say that 3 times fast!!). I added 3 medium pearls for the flower centers and was really pleased with the result!
Hope it inspires you with your everyday card making!
Chrissie
Wednesday, October 17, 2012
This week is going too fast!!

All of the card uses Stampin Up products except for the adorable little witch on a broom. There are a number of free or very inexpensive digital stamps out there on the web. I have bought a few like this that have such adorable faces. Once they are on my computer, I then open them in the My Digital Studio2 program from Stampin Up. I can then change the size to fit what I want to do with it and print it out to use on my card. I coloured this one by hand with markers but the MDS2 program now has a paintbrush tool so I am going to try to colour it on the computer next time!
The card is made from Tangerine Tango with Basic Gray dotted paper from Howlstooth and Scaringbone Designer Series Paper, and the flag pieces under the sign are from the same DSP. There is a small piece of Basic Black cardstock behind the witch which I embossed with the Spider Web folder and brushed lightly with a sponge and Whisper White ink. I used various markers to colour the witch including Rich Razzleberry, Old Olive, Tangerine Tango, Pretty in Pink, Cajun Craze, and for her skin, the Blush Blossom marker that is sold on page 157 of the Annual Catalogue.
I did the greeting on my computer and printed it on Very Vanilla card stock, added some Tangerine Tango ribbon flipped over (has white polka dots on the other side), a Basic Gray button with some retired Very Vanilla 1/8" ribbon threaded in it.
So I love how it turned out and I now have that stamp on my computer for use again in years to come! So fun!
Be back soon,
Chrissie
Monday, October 15, 2012
Merry Monday!!

Once the weather cools, I really think I have to get to my Christmas crafting well underway! I love this card for its simplicity and water colour look, and it is also very traditional.
I used a Real Red card with a Lucky Limeade layer on the front. On top of that I layered a piece of Very Vanilla (3 3/4" x 5") but covered the bottom part with the stripe pattern from the Candlelight Christmas Specialty Designer paper. Simple but beautiful colours.
For stamps, I used the single stamp "Heart of Christmas" and the holly branch with berries outline stamp from "Watercolour Winter". I only used Real Red and Lucky Limeade inks, along with a blender pen to lightly colour the holly leaves and the berries. Add a small piece of Lucky Limeade ribbon and a couple of pearls, and it is a lovely card to give to anyone!
Enjoy,
Chrissie
Friday, October 12, 2012
More Halloween!

My Mother-in-law is 85 and very advanced into Altzheimers so is very child-like. I make cards to send to her for each occasion as she lives in Collingwood and we don't go there very often. I hope she will get some joy from seeing this cute witchy-poo...or at least as much joy as I had piecing her all together. Every punch I used (and there were lots!!) is current in our catalogues but the paper I used for her skin was an old colour, Blush Blossom, that I just happened to find a few sheets of in my stash. (We still have the Blush Blossom marker so maybe Stampin Up will bring back the paper sometime, too.)
Have lots of things to do yet for our Christmas Stamping Event on the 21st so I have a busy weekend ahead of me! Enjoy yours!
"Talk" soon,
Chrissie
Thursday, October 11, 2012
Have a Halloween Project for you today!

Aren't these the cutest Halloween treat containers?!! They are all made using the Petite Purse Big Shot Die and lots of added details! I just adore these and hope to make a few before Halloween.
Sorry I missed Monday and yesterday. I got sick with a cold on Sunday and didn't get to go anywhere on the weekend. Lewis had a cold at the beginning of last week and it was inevitable that I would get it too! My head is still really stuffy but (touch wood) it hasn't moved into my lungs and made me much sicker! I feel like I am improving but with my comprised health and my age(!), I do take longer than the average person to get over a cold!
Plus I don't know about you but I don't adjust to quick temperature changes...in the spring and fall primarily. The Thursday before Thanksgiving was 22C with a Humidex of 25C and two days later it was about 10C with a wind chill factor. Now that is an abrupt change!!
Anyway, that's it for today...have to make a few cards today for my friend. Stay tuned for more Halloween cards/projects!
Be back soon,
Chris
Friday, October 5, 2012
It's the Beginning of the Thanksgiving Long Weekend!


We may have to take a drive a little north of London this weekend so we can enjoy the colours in person. Sometimes we have gone up around New Hamburg (between Stratford and Waterloo) and the trees are so gorgeous. There is a gorgeous white church steeple just above the trees around New Hamburg and it is just a stunning sight.
May you all count all your blessings this weekend. I will be...I have so much to be thankful for, and I will be thinking of as much as I can remember!
With thanks for all of you who look forward to my blog posts,
Chrissie
Wednesday, October 3, 2012
Two Posts in One Day!! This is a Very Special Pilot project from SU!!
Hey there...sorry no extra card on this post, just some exciting Stampin Up news!
These three stamp sets...Word Play, Perfectly Penned, and Seasonal Sayings are now being offered as single stamps. That means that you can just purchase the stamp(s) that you want from these sets without having to buy the whole set!! Awesome, isn't it?!!
I am attaching links to the flyers for these 3 stamp sets so you know how much each stamp costs by itself. These stamps come in a small clear bag and are the clear mount stamps only (no clear or wood blocks are provided...the clear block that works with the stamp is listed beside the price but is NOT included!)
Please make sure you are looking in the second column for the Canadian price! Each flyer has pictures of the full stamp set for you to choose from (keep track of how many stamps from a set you are going to purchase as it could end up being less expensive just to buy the whole set!) This offer is good until Jan. 2, 2013 and is a pilot project so let's all make this work!!
Word Play Flyer
Perfectly Penned Flyer
Seasonal Sayings Flyer
Thanks for looking at the flyers and possibly purchasing your favourite stamps,
Chrissie
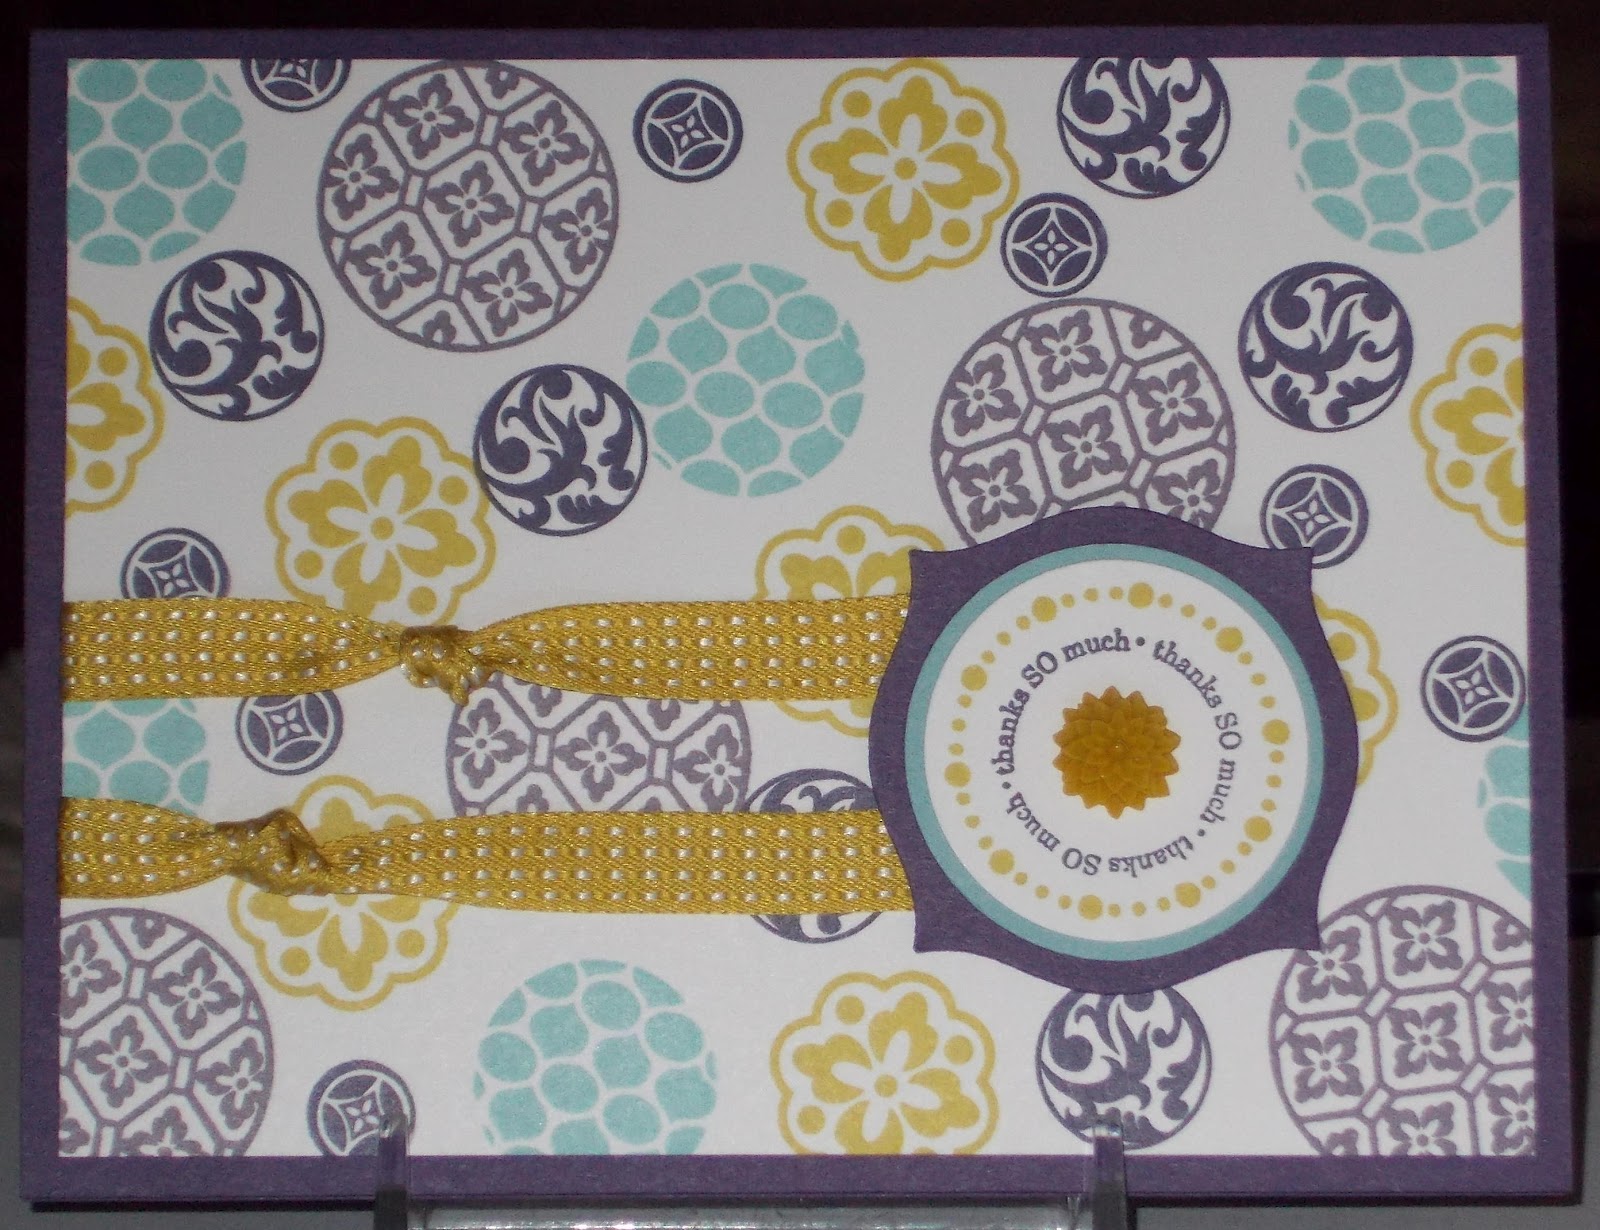
Wednesday Already...Do you have plans for this Weekend?
We will make a turkey meal for ourselves as we love the leftovers! My friend, Aimee, is coming over on Monday so we can work on cutting her supplies for our upcoming Christmas event on Oct. 21st. I have a great paper cutter that cuts many sheets accurately very quickly. Aimee is prepping the four piece tag cards and there is a lot of cutting to be done! I am so looking forward to spending time with Aimee and helping her get some of her prep done, quickly and easily!
So in September for every $50 we spent in our orders, we got a free roll of ribbon in one of the newest 5 In Colours for this year. I got a lot of ribbon!! So you will see it on cards like the card on this post!
I used the Summer Starfruit ribbon and the four ink colours of Summer Starfruit, Elegant Eggplant, Perfect Plum, and Baja Breeze. I used a great stamp set that I love "Circle Circus". It is all mounted on Elegant Eggplant and stamped on Whisper White. Also added a Summer Starfruit dahlia in the center of the circle! Really love the dahlias!!
I will be back on Friday with some lovely autumn photos our niece took up by Ottawa.
"Talk" to you soon,
Chrissie
Monday, October 1, 2012
Wow, it's October 1st! And Merry Monday!

This time I used snowflakes from "Snowflake Soiree" and Bashful Blue, Marina Mist, and Midnight Muse. I think this would be a great card to send to people who don't celebrate Christmas. I may be making a few of these for my holiday cards.
I have been really busy making lots of cards for Fall/Thanksgiving, and more Christmas projects. Ragweed is still at 2 out of 10 (they changed the scale on the Weather Network!) so I am still spending a lot of time inside!
I will have more for you all on Wednesday...have a great start to your week!
Bye for now,
Chrissie
Friday, September 28, 2012
Another Yeah! It's Friday!

My grandkids have put lots of post-it notes in the Sears Wishbook for me so I need to get going so that I can get what they have chosen (I never get them everything(!!) but I do like to get them things that they want.) It was more fun when they were little as I could shop for just toys but now that Maddie is 12, she wants jewelry and clothes, and Blake who is 8, wants every Lego set out there! Not quite as much fun for Grandma as I love toys!
Here is a sweet Thank You card that could have the greeting changed for any occasion, I think!
The card is Primrose Petals (an In Colour that we have until May 2014), with Patio Party DSP layered on top. I love this design of DSP...all the multicoloured little butterflies are so cute!! Then I matched the flag pieces to the DSP and used Baja Breeze, Summer Starfruit, Primrose Petals, and Midnight Muse. I used scraps of these colours to punch out the small flowers with the Boho Blossoms punch and with the Elegant Butterfly punch (new this catalogue). I added 4 rhinestones on the butterfly to add a little bling to the card.
So I have a card that is quite easy to make and yet looks really nice (I think!).
Enjoy your fall weekend and enjoy the changing of the leaves...it is so pretty at this time of the year to see the gorgeous colours of nature!
So long for now,
Chrissie
Wednesday, September 26, 2012
It's Hump Day Today! Wednesday...yeah!

I hope you are enjoying my "regular" posts of 3 days per week. I love sharing what I make with you. There is not a day that goes by that I don't craft something (unless I am extremely sick...but touch wood, I am doing pretty well). I am enjoying the cooler temperatures which make it easier for me to do things at home and out in the world.
On to the card,
I made this card for a dear young woman who we have known her whole life...whose birthday is September 11th. (I also know another woman, the daughter of a dear friend who is now in her 30's, who also has her birthday on Sept. 11th...I feel bad that this day is memorialized every year for being such a sad day, and not a celebration of their "birth" days.)
Yes, I cut out all those zigzag pieces out of different colours of card stock. I used the Tasteful Trim Big Shot die and some strips from 12 x 12 sheets of card stock. If I was really careful, I could cut 2 strips at a time! The colours I used from the bottom right corner are...Pretty in Pink, Real Red, Tango Tangerine, Daffodil Delight, Old Olive, Tempting Turquoise, Pacific Point, and Rich Razzleberry. I also used Basic Black 1/2" Scallop Dots Ribbon, and one of the dies from the Apothecary Accents Framelits. The words come from the Sassy Salutations stamp set...I love the font in the whole set!
Hope the rest of your week goes very well for you all,
Be back soon,
Chrissie
Monday, September 24, 2012
Another Happy Merry Monday

Card is Cherry cobbler with a layer of Crumb Cake (used to be called Kraft). Then we have this really cool 12 x 12 paper called Core'dinations (also in the Holiday Mini). I used the Early Espresso colour and ran it through the Big Shot with the Woodgrain Textured Impression Embossing Folder. Then, because this paper has a different colour core, I sanded the top very lightly to give the look you see here. I love this! (the Core'dinations is also available in Cherry Cobbler and Gumball Green, one colour per package.)
I glued the wreath onto the front using Tombow white glue, topped it with a bow of Cherry Cobbler Seam Binding and stuck Cherry Cobbler brads into the knit (with glue on the ends) to represent the berries. The greeting is from "Christmas Lodge" (in the Annual catalogue) stamped with Gumball Green on Very Vanilla card stock.
We are doing this wood look technique on one of the cards at our October 21st Christmas Stamping Event. Come out and give it a try, and maybe you will want to do more of it!!
Also if you would still like to make the ornament on the front of the Holiday catalogue, please let me know and we can set up a time to get together. Or if you want to have me make it for you, I would be more than happy to do that! If you want more than one, I can do that, too!! Just send me an email and I will get right back to you. I am going to do a blue one and I will post it when I get it done!
Have a great week, everyone...I will be back in a couple of days!
Thanks,
Chrissie
Friday, September 21, 2012
It's Friday...Hope you get to Stamp this weekend!

I just wanted to share this with you as it could be made with another punch, and colour of cardstock and Designer Series Paper.
What I used...
Cardstock: Blushing Bride (retired), Whisper White, and Twitterpated DSP(current in the Annual catalogue).
Ink: Black Stazon
Stamp: Petite Pairs (welcome, baby)
Accessories: Pleated Ribbon (retired), Round Tab Punch (retired), Scallop Oval Punch and Large Oval Punch, Big Shot and Fancy Fan Folder, and lots of dimensionals and Tombow! (There is a great die that would work for the dress if you don't have the Round Tab punch...Lots of Tags Sizzlits (the top left one in the Annual catalogue could be folded or cut to have a rounded bottom...think I might try that next time!
I hope this has inspired you to work with this cute idea and make it your own! Please email me pictures of your creations...I'd love to see what you are doing!
Stay in touch,
Chrissie
Wednesday, September 19, 2012
Wednesday...Yeah!

Here is that flower again...told you I loved it!! This is a card that can be made for any occasion and in any colour...just coordinate your cardstock, ribbon, and ink.
Cardstock: Midnight Muse, Whisper White
Ink: Midnight Muse
Stamps: flower from "Blooming with Kindness", words from "One in a Million"
Accessories: Midnight Muse 3/8" Stitched Satin Ribbon, Big Shot, and Large Scallop Edgelit and Delicate Designs Folder (scallop edge pattern)...I recommend cutting the edge first and then embossing the design.
I love the simplicity of this card and how it stands out beautifully!
See you soon,
Chrissie
Monday, September 17, 2012
It's Time for Merry Monday Again!!

(Sure hope I don't get into trouble with copyright laws...it's not that I will be mass producing these!! In fact this is probably one of a kind!)
Cardstock: Marina Mist card, and Scraps of Whisper White, Real Red, Sahara Sand, Basic Black, Summer Starfruit, Soft Suede, and Lucky Limeade.
Ink: Real Red, Permanent Black Marker
Stamps: Hostess Set...Wacky Wishes (or greeting of your choice!)
Punches: (Everyone you own!! Just kidding!!) Ornament, Large Oval, 1 3/4" Circle, 1/2" Circle, Owl (two largest circles for eyes and ears on Pig, and top of their Santa hats), Petite Pennants Builder (straight sided one), Cupcake Builder (icing piece for clouds), and Word Window (punch and then insert piece again to shorten). Other small pieces are cut by hand!
Accessories: Dazzling Details Glitter Adhesive (the clear one), and although I never mention them, Dimensionals. I use them on every card I make, I'm sure!!
Hope this makes you smile today!
Chrissie
Friday, September 14, 2012
Friday - End of the Second Week of School!

This is an oldie, but a goodie!! I have made this card in a few colour combos over the past year or so, and it is always a top seller in our cards for CCF.
I hope that everyone is now into their fall routine...I know I am!!
Card Stock: Pool Party card, Not Quite Navy layer, and So Saffron, Whisper White, Lucky Limeade for Sizzlet Die.
Inks: Not Quite Navy, Daffodil Delight marker to colour the flames on the candles.
Stamps: Hostess Set...Priority Mail (but any greeting could be used!).
Accessories: 3/4" Circle Punch and Large Oval Punch for flower petals (punch circle first and then oval around the circle), 1" Circle Punch, Pool Party 3/8" Ruffled Ribbon, Pool Party Brad and small hole punch for putting brad on the circles (or Paper Piercer), Curly Label Punch, Big Shot and Little Leaves Sizzlit, Two Way Glue Pen.
Hope this becomes a favourite of yours, too!
Chrissie
Wednesday, September 12, 2012
Today's Card

Card stock: Whisper White (I added a second layer of Whisper White on the front of the card so that I would be able to wrap the ribbon around it.)
Designer Series Paper: Gumball Green Dotted from the In Colour Paper Stack
Ink: Tangerine Tango, Gumball Green, Soft Suede (stamped off once with the words)
Stamps: Summer Silhouettes, French Foliage (words), Itty Bitty Banners (happy birthday)
Accessories: Corner Rounder, Big Shot, Delicate Designs Folders (floral), Itty Bitty Banners Dies, Tangerine Tango 1/2" Scallop Dots Ribbon, Itty Bitty Shapes Punch Pack (scallop circle), 6 of the smallest Rhinestones.
Be back soon,
Chrissie
Monday, September 10, 2012
Merry Monday Time!!!

Isn't this card so sweet? This was not my idea but I changed a few things and tweaked it a bit to work for me. (Sorry, I don't know who originally made this design because it was forwarded to me, but "Thank You" for your creativity!)
I started with a Whisper White card and using the Simply Scored Scoring Tool, on the back of the front part of the card...did you get that??..., I scored lines at 1/4" and 3/8" all around the card. Then I stamped my greeting and built the tree from there. (It has to be scored on the back so the lines are puffed on the front of the card!!)
Card Stock: Whisper White, Old Olive, and scraps of Real Red and Soft Suede
Ink: Old Olive, Real Red
Stamps: Curly Cute, Starburst Wheel and Large Handle (I rolled the wheel design in Old Olive onto Old Olive Card Stock before punching the hearts...did nothing extra to the Real Red heart!)
Accesories: Cupcake Builder Punch (for tree basket), Small Heart Punch, Owl Punch (for the tiny hearts), 1/8" Real Red Taffeta Ribbon, lots of Rhinestones.
Do you love it? I sure do...if doing this for a class you may want to make a template so that everyone knows where to place the punched out pieces. I stamped my greeting, then put on the top heart and the Suede basket and estimate the other rows from that!
Enjoy!
Chrissie
Friday, September 7, 2012
It's Friday!! And my Son's Birthday!!

So here is a fun masculine birthday card! (Not the one I am giving my son but even if it was, he doesn't have time to check my blog anyway!!)
This card uses the technique of Faux Tearing. For the area underneath the anchor tag, I adhered, temporarily, two pieces of card stock that I had previously torn, one above that area and one below. That left me a space in between to lightly sponge on my ink and to stamp the compasses. After doing both of those, I removed the torn extra card stock and was left with this beautiful design on my card layer.
Stamps: The Open Sea (the compass and globe stamps are stamped off once in Soft Suede before stamping on card, the anchor is full strength on a scrap of Very Vanilla), Words are done on computer in Early Espresso.
Card Stock: Soft Suede, Very Vanilla
Ink: Soft Suede, (and Early Espresso from my computer in MDS2, Stampin Up's on line cardmaking and scrapbooking program...try it for free for 30 days right now!!)
Accessories: Sponge or Sponge Dauber, SU retired twine (just use more layers of Linen Thread twisted together), Extra Large Tag Punch, Small Hole Punch to use on tag, and 1 medium of the Naturals Designer Buttons.
(I am sure I have mentioned this before but my friend, Karin, and I make lots of cards to donate the proceeds to Chrohn's and Colitis Foundation and I often use up some of my retired products on those cards to reduce our costs. There will be cards that do use retired Stampin Up products but I will try to give a you an option to use something current!)
Have a great weekend!
Hugs,
Chrissie
Wednesday, September 5, 2012
Happy Wednesday!!

This is another one of the swaps that I made to take to Regionals. I love this card and it is a very trendy style right now, called Triple Layer Card.
For this card I used Midnight Muse and Whisper White cardstock. I want to give you the measurements to this card so you can try this technique:
Midnight Muse...8 1/2" x 5 1/2" for the card base (fold in half!),
3 1/4" x 4 1/2", and 2 1/4" x 3 1/4"
Whisper White...4" x 5 1/4", 3" x 4 1/4" and 2" x 3 1/4".
You layer the three white pieces together (1/2" edges on all sides as you stack the layers. Adhere with a temporary adhesive. Then stamp your design every which way over all three layers at once (there will be a little missing on the 2nd and 3rd layers but that will be covered up by the Midnight Muse layers).
I used the flower from "Blooming with Kindness" (love that flower, can you tell?!) with Midnight Muse ink. Make sure your ink pad has enough ink to give you solid and clear images. Once you are finished the stamping take your 3 layers apart and layer on their coordinating Midnight Muse pieces. Make sure you line up your layers so the flowers match up!!
I added some Whisper White 5/8" organza ribbon and a Midnight Muse Dahlia. I used a greeting from "Petit Pairs" and the 1 1/4" and 1 3/8" circle punches on scraps of cardstock.
As I have no idea how to make a video, let alone post it(!!), so I am going to refer you to an amazing US Stampin Up demo, Dawn Olchefske at http://dostamping.typepad.com for a great video. (You will have to go back quite a few pages (maybe as much as 10 pages) on her blog to find it but she has great step by step instructions.
Hope you give this a try!
Be back soon,
Chrissie
Tuesday, September 4, 2012
Ornament Class

I will be offering this ornament class (you will only make one...they take a while) on Wednesday, Sept. 19th at 6:30 pm or Thursday, Sept. 20th at 6:30 pm. It will take you about 1 1/2 to 2 hours to put this together. This class will cost $20 per person.
I will also have extra kits that can be purchased for $7 each including everything you need to create this ornament at home with only your glue gun and Dazzling Diamonds, if you choose to glitter your ornaments.
Please let me know as soon as possible if you are able to come to either class and if you want kits to make more. (As always, if these times don't work for you, just let me know what does and we can work something out.)
Hope to see you soon,
Chrissie
Monday, September 3, 2012
Merry Monday card!

Happy Monday!!
It is my plan to post a Christmas card or 3D project each Monday from now until at least the end of November. So let's start our Merry Mondays today!!
I made this card as one of my swaps for the Stampin Up Regional Event in Hamilton on August 18th. It was a great day and I loved making and colouring this card!
Stamps: Winter Memories, and Joyous Celebrations (both from the Holiday Catalogue)
Cardstock: Cherry Cobbler, Gumball Green, and Very Vanilla.
Designer Series Paper: Be of Good Cheer (Annual Catalogue)
Ink: Black Stazon, Cherry Cobbler, Gumball Green, Crumb Cake and Sahara Sand.
Accessories: Blender Pen (I used ink from the inkpad in every colour but the Black Stazon, to lightly colour the sleigh image), Extra Large Oval Punch, 1" Square Punch to make the Flag end on the Gumball Green cardstock strip, Gumball Green 1/4" Sweater Trim.
I got lots of compliments on this card, and you would too, if you made this card for your family and friends!
Be back soon,
Chrissie
Friday, August 31, 2012
Friday's Cards


I thought I would post both of these cards at the same time as they are variations on each other.
First card uses Basic Black for its base and the second uses Cherry Cobbler. Also Very Vanilla is used for both tags.
Both fronts use the flower from the "Blooming with Kindness" stamp set with Versamark Ink and Clear Embossing powder. Then heated with the Heat Gun to give this beautiful shiny dimension.
Each card uses a Dahlia, ribbon and ink in both of those new In Colours, Summer Starfruit on Black card and Primrose Petals on the Cherry card.
The fabric flowers are both made using the Timeless Portrait fabric, using the two floral prints. You can make six flowers from each pattern. Across the 18" side of the fabric, make a small cut with scissors at every 3". Then tear the fabric all the way to the bottom. Then fold four times lengthwise until you have an approximate square of 3" and it is 8 layers in your little bundle. Then using the Big Shot and the Circles #2 Originals die (114526), cut your stack of fabric on the largest circle (2 1/2"). It will easily cut all eight layers at once. You will now have 8 perfect circles. (If you have another die cutting machine, this die will fit in most of them.)
Punch out a 1 3/8" circle from a cardstock scrap (any colour as it won't show!). Fold each circle of fabric into fourths and glue to the
1 3/8" circle with the point facing in to the center. Do that with 3 more fabric circles to finish the first row. Do the same with the top layer of 4 fabric circles but offset each piece by a 1/2 the width of the previous row so the seams are not in the same place. Then I glued the dahlia in the center and the flower was the last item that I glued onto the card, by placing glue on the bottom of the paper circle all the fabric pieces are secured to. I used liquid Tombow glue for attaching all the flower pieces and to attach the flower to the card. (Don't use too much glue or it will gush between the flower pieces!!)
If you have any questions, or need to see photos of the process, let me know and I will get some posted here. (The flower does add a little dimension to the card but it will flatten to put into a regular envelope.)
This is one of my favourite cards recently but I have more to come!
See you soon,
Chrissie
PS: You can't punch fabric with a regular circle punch...you need to use a die and the Big Shot machine.
Thursday, August 30, 2012
Today's Card

This card is made using the Hostess stamp set, "A Cherry on Top".
Cardstock: Real Red, Lucky Limeade, So Saffron, and Whisper White
Ink: Real Red, Lucky Limeade, So Saffron
Accessories: Chevron Embossing Folder, Labels Collection Framelits, Dotted Scallop Ribbon Border Punch, Real Red 1/4" Stitched Grosgrain Ribbon, Cherry Scented Embossing Powder (on the cherry only).
Hope you like!
Be back soon,
Chrissie
Wednesday, August 29, 2012
I know it has been FOREVER since I posted!!
I am so sorry that I haven't been around for awhile. It has been a tough summer for my allergies and asthma but I am hoping that some cooler weather will be here in a few weeks. That will help my breathing and give me more energy!!
I have been making cards like crazy this summer so I have lots to show you! I am going to post 3 times per week (can't guarantee the days of the week!!) but I don't have a very exciting life to talk about so most days it will just be a card or project. Hope that is good for you all!
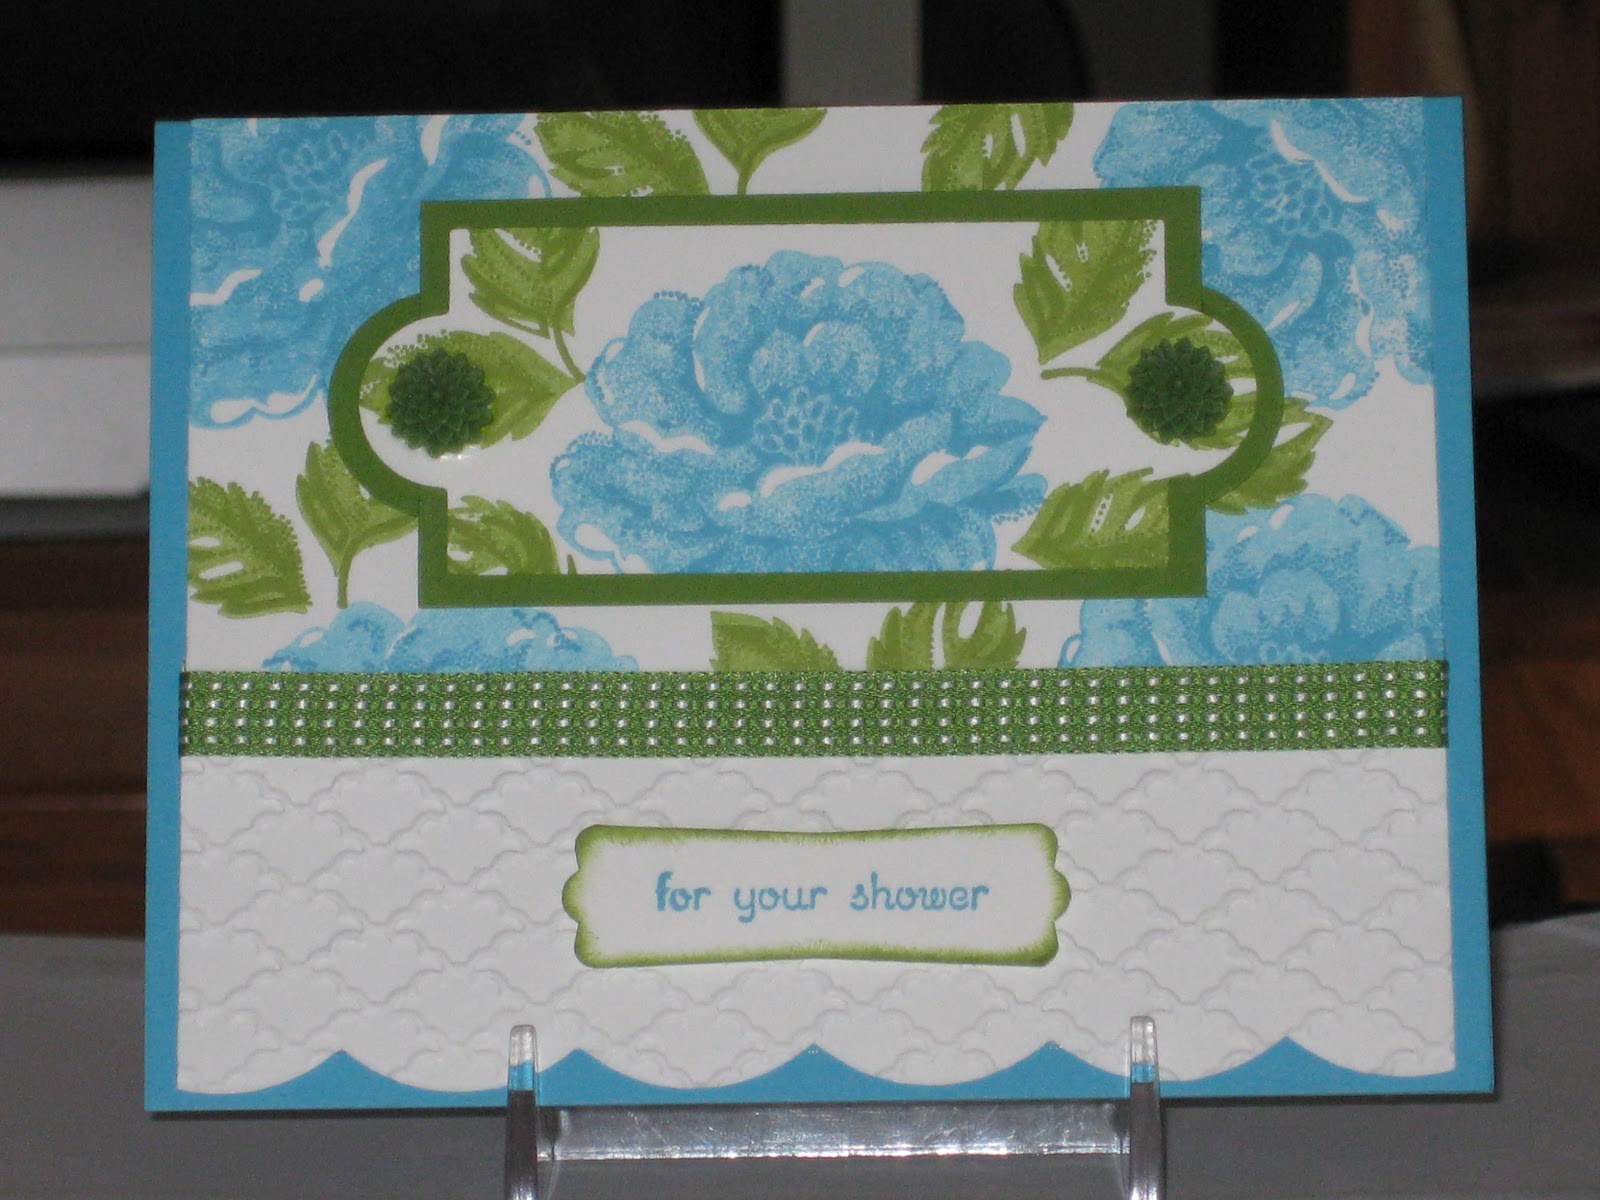
 Here is a card for today...a wedding shower card:
Inks...Tempting Turquoise, Gumball Green (I stamped off once for the solid layer, then used the ink full strength for the outline layer).
Cardstock...Tempting Turquoise card, Whisper White, and Gumball Green.
Stamps...Stippled Blossoms (one of my new favourites!) 2-step stamping set, Teeny Tiny Wishes.
Accessories...Gumball Green 3/8" Stitched Satin Ribbon, Modern Label Punch, 1" Circle Punch, Big Shot, Large Scallop Edgelit, Apothecary Accents Framelits, Delicate Designs Scallop Edge Folder, 2 Gumball Green Dahlias, Sponge Dauber (to highlight edges of Modern Label punched out piece).
I will be back tomorrow with another card!
Thanks for stopping by,
Chrissie
I have been making cards like crazy this summer so I have lots to show you! I am going to post 3 times per week (can't guarantee the days of the week!!) but I don't have a very exciting life to talk about so most days it will just be a card or project. Hope that is good for you all!
Inks...Tempting Turquoise, Gumball Green (I stamped off once for the solid layer, then used the ink full strength for the outline layer).
Cardstock...Tempting Turquoise card, Whisper White, and Gumball Green.
Stamps...Stippled Blossoms (one of my new favourites!) 2-step stamping set, Teeny Tiny Wishes.
Accessories...Gumball Green 3/8" Stitched Satin Ribbon, Modern Label Punch, 1" Circle Punch, Big Shot, Large Scallop Edgelit, Apothecary Accents Framelits, Delicate Designs Scallop Edge Folder, 2 Gumball Green Dahlias, Sponge Dauber (to highlight edges of Modern Label punched out piece).
I will be back tomorrow with another card!
Thanks for stopping by,
Chrissie
Thursday, May 31, 2012
It is before June 2nd, but not by much!!

My daughter-in-law's parents are celebrating their 45th wedding anniversary this weekend so I sent them this card. By doing a Google search, I found out that the 45th anniversary is sapphire so I went with a Pacific Point card base. I also used the paper from "Beyond the Garden" which is only available until midnight tonight.
The stamp set with the numbers is called "Memorable Moments" and will be available as of tomorrow.
If you think I would have sent you a catalogue and you haven't received it yet, please let me know! Or if your catalogue has arrived in poor condition...ripped or crunched, please let me know as Stampin Up is replacing any damaged catalogues.
If you have received your catalogue, let me know what you think! I love it and feel like I can just pick those buttons and brads right off the page! The 5 new In Colours that we will have for the next 2 years are yummy and I am looking forward to doing some card making with them.
I have been working on a couple of things (plus I was sick a couple of weeks this past month, but I am fine now!). One thing I am doing is making some Christmas cards for our Christmas in July event (which might get moved to August...I will keep you posted). The other thing that has been taking a lot of my time is re-arranging my craft room after pulling out so many stamp sets, ribbons, and paper that retires as of today. It is always a really fun time to start with new and different papers and stamp sets.
Two of my demo friends and I are having a huge sale on Sunday, June 3rd and Monday, June 4th. If you want more details, please let me know!
I hope to have some cards ready soon for you...made from new stamp sets and papers. Please contact me if you want me to send you a catalogue (if you are in Canada only) and I would be happy to do that.
Enjoy your first weekend of June, and I will be back soon!
So long for now,
Chrissie
Wednesday, May 2, 2012
It has been exactly one Month since I was Here!!
Gosh, time sure does fly for me...do you all have the same problem?
In April we had Easter, Blake's 8th birthday, and Blake's First Holy Communion. Here is a picture of Blake in his suit at church this past Sunday (the 29th)...
 That is my DIL's face in the upper left and my son's arm and legs at the bottom. Blake did a great job at the church and then there was a party back at their home for him. A lovely day!
 This is Sean and Brenda, and Maddie and Blake in front of their lovely home. (Maddie had on these cute little kitten heeled shoes and looked so grown up for 11...I thought I would borrow them but she only wears a size 3!!)
You probably didn't come here just to read about my family so here are a couple of cards...

 These cards are ones that you can use any Designer paper with and the Cupcake punch is not retiring so everyone can copy these designs at any time.
Just a reminder that the Accessories Retiring List is on a first come basis, but the Retiring stamp sets will be available until May 31st. (Just let me know if you need me to send you the PDF's of the retiring products.)
Brand-new catalogue starts on June 1st!!
(If you have purchased from me before, you will be receiving your copy in the mail before June 1st!)
That's all for today...I promise to be back before June 2nd!!
So long for now,
Chrissie
In April we had Easter, Blake's 8th birthday, and Blake's First Holy Communion. Here is a picture of Blake in his suit at church this past Sunday (the 29th)...


You probably didn't come here just to read about my family so here are a couple of cards...


Just a reminder that the Accessories Retiring List is on a first come basis, but the Retiring stamp sets will be available until May 31st. (Just let me know if you need me to send you the PDF's of the retiring products.)
Brand-new catalogue starts on June 1st!!
(If you have purchased from me before, you will be receiving your copy in the mail before June 1st!)
That's all for today...I promise to be back before June 2nd!!
So long for now,
Chrissie
Monday, April 2, 2012
April Offer from Stampin' Up!!
Summer Smooches Offer
Okay here is something I want to share with you all. For the month of April we can all pre-order from these products. These items will be in the new Big Catalogue...except for the brads and the stencil. So if you want to get the jump on something new to play with, this offer is for you!
Click on the words ... Summer Smooches Offer ...above and you will be taken to my online store where you can see the products by clicking on Promotions!
Let me know if you want to get in the Summer mood with these fun products!
If I can figure out how to put the PDF flyer in this post, I will add it as soon as I can!!
Chrissie
Have a few Minutes!!


Here are a couple of cute Get Well cards that my friend, Karin, and I made last week. The first one has stamped Bandaids but you could easily use real ones, then you could copy the card with your own colours. The second card I had done before but I changed up the colours. The turtle and the verse come from the big Stampin' Up catalogue and are the stamps that we are selling this year to support Ronald McDonald houses. Proceeds from Canadian purchases stay in Canada to support RMC here. There will be a new set in the new catalogue which we get a month earlier this year!!! Yes, starts June 1st...look for your in the mail before the first as we will be able to send your big catalogues directly to you like we do the Mini catalogues. I am so excited.
I am also really excited because we are getting the retiring stamp list on April 15th and the retiring accessories list on April 25th. You will be able to get any stamp set you want in the big catalogue from this year up until June 1st but the accessories are first come, first serve. Remember wheels are classed as accessories, not stamps!!
Before I go I have to tell you what is now a funny story but it sure wasn't at the time. I had some funny things happening to my computer so I decided to upgrade our Rogers virus protection. I have always been able to do things through our on-line account with them, but not this time. So I phone them...you know what it is like...first you have to be passed to someone can actually help you!! Okay, I finally have the right person and he says, "you can't change anything because you are moving on April 8th. Where do you want your services transferred to?". Well, I freaked because that was only 2 1/2 weeks away and we have more than 3 years still left on our lease. So our wonderful building manager checks it out on the Monday morning (this was on a Saturday) and no, no one is moving in here and we aren't going anywhere else. So someone has either made a big mistake here or at Rogers, or someone has played a nasty prank on us. Once I figured out that April 8th was Easter Sunday, I kind of thought that it was a nasty prank. Anyway we are home on Easter Sunday for most of the day so we can make sure no one else moves their stuff in here!!
So these are the life sucking things that can take a few days to straighten out...what a waste of my time and Rogers time. I am so glad to have found that out before April 8th so we didn't lose our internet and cable TV!!
Hope you had a laugh from the interesting things that happen in my life and I will be back soon!!
Chrissie
Tuesday, March 20, 2012
Cool Technique!!


Hi there!! Wow, what a gorgeous March break for the kids, and the kids at heart!
We had fun with Maddie and Blake here for 3 days but it was so hot in here. I was running the portable AC that we bought last year in our bedroom but our central air was not working. We got it fixed on Friday afternoon but not in enough time for me to really spend time the kids. We did go out on Thursday afternoon to get Sculpey clay for Maddie (she is very creative) and to the Mastermind store on Fanshawe. We were wowed by the store as I hadn't been there since the previous owners and it is so awesome. Blake is turning 8 soon and so he got to pick out his birthday gifts from us, and a Lego dude for while he was here.
Maddie had some homework to do over the break...to trace back her family roots at least until her great-grandparents. Since I have been working off and on for the past year on my family tree, it was easy to pull the info that she needed. It was fun and she really seemed to be interested...I know, she's almost 12, so she was probably just being interested so Grandma would tell her all the answers for her homework questions!! I had fun and it is fun sharing family history with another generation!
Okay so this is not my idea (it is from Julie Davison, a US Demo), at the top of the page, but it is so cool! The Modern Label punch makes a perfect layer for the Blossom Punch (in the Occasions Mini...available until the end of April/12).
Enjoy the rest of this gorgeous weather...it can't last right now but it will return in a couple of months!!
I will be back soon,
Chrissie
Sunday, March 4, 2012
Other Cards for Thursday's Class!


I hope you love the cards!! On the Easter card, you will stamp your verse on the front of the card straight so you don't have to put an extra piece on the front!!! But we can always put another piece on like I did!
You will be making both of the second and third cards as they are just different colours but the same style of cards. That way you have some extra options when you need a card for a younger person. (Actually I would send this to anyone!!)
Anyway, I still have 2 spots left for Thursday if you are able to come over. The class cost is $20.
I will be back soon...right now I have to cook some supper!!
So long for now,
Chrissie
Monday, February 27, 2012
Cards for Next Week's Class


These are the 3 female cards we are going to make on March 8th. I still have spots left so if you want to come let me know!
The top card I got from another demonstrator, Julie Davison, from the US. It is so easy to make that quilted look and it is using the Twitterpated DSP from the Occasions Mini. Love this card!
The middle card is one that I really liked from an on-line class that I purchased. It is so bright and cheerful, using the Poppy Parade paper and ink. It also uses some of the Designer paper that is free with a $60 order (only until March 31st!!). I love this year's paper and it's name. It is called Everyday Enchantment!
The third card I made at my friend, Heather Summers' birthday card class a couple of weeks ago. Heather is so amazingly talented and creative...everything she designs is so cute! I really enjoyed just going out to stamp with some of Heather's friends. It was a great afternoon! This card uses the stickers from the Occasions Mini that are called Sweet Shop. Sometimes using stickers is just as much fun as stamping!!
I have the designs organized for the gender neutral kids' birthday card and the cute Easter card but I haven't made them yet. I will try to get to it in the next couple of days and post them here.
Tomorrow I am stamping with my friend, Karin, for the cards we make and sell to fundraise for Chrohn'/Colitis. We haven't crafted together since October so I am really looking forward to tomorrow.
Then Wednesday I have to start the prep for my colonoscopy on Thursday afternoon. Not really looking forward to it but might help me lose a couple of pounds temporarily!! Always have to look on the bright side! (I don't have any problems, this is just a routine screening!) Not sure how I am not going to eat for over 24 hours (can have clear liquids) as I love my food! I will do what I have to, though...just so I don't have to do it again too soon.
I thank you for stopping by my blog today. Looking forward to chatting with you soon.
So long for now,
Chrissie
Thursday, February 23, 2012
Busy, Busy, Busy!!

Hi!! Life has been really busy again lately. I want to thank everyone who came to our Fundraiser for the Rangers last Saturday. We made over $600 for this wonderful, teenage level of Guiding. We had so much fun with about 40 new and experienced stampers...it was a wonderful day!
But then, of course, I was exhausted and rested on Sunday and part of Monday. Spent some time on putting away all the supplies I had taken to the event...ink pads, punches, etc. Then Sean, Brenda, and the kids came to London and we went for a very yummy dinner at the Keg to celebrate Brenda's birthday. Maddie and Blake sat through dinner eating and playing on their devices...Maddie on her IPod and Blake on Sean's Playbook. It was pretty funny but Maddie did show me some things about the game Angry Birds that I didn't know and now I am much better at that game!!
On to the card...
This is one of the cards that my friend, Karin, and I made to fundraise for Chrohn's and Colitis. We have been doing this for a few years now and we have made a lot of money for the Foundation...one card at a time!!
The top of the card is all stamped...it is not pre-designed paper. I had a lot of fun doing that! I used Real Red, Daffodil Delight, Old Olive, River Rock, Pumpkin Pie and Tempting Turquoise inks. I used the center part of the flower in the "Mixed Bunch" stamp set (in the Occasions Mini 2012) and the dotted circular tree top from "Trendy Trees" (in the big catalogue) as my two stamps. Then I just went crazy and no two papers were the same!!
The red ribbon is retired but there are lots of other choices in the catalogue to use. I also used a piece of River Rock striped DSP from the paper pads in the big catalogue with the other Designer Series papers. Around the scallop punches medallion, I put the largest rhinestones to really give it some bling! The whole card is nice and bright for the upcoming spring season! (Sounds like we are going to get more winter today and tomorrow before we see spring!)
Have a fun weekend, even if you are out shovelling snow...enjoy the amazing beauty of the white world! (I can say that because we no longer have to shovel!!)
So long for now,
Chrissie
Subscribe to:
Posts (Atom)